Casing is the easiest type of moulding to install because the joinery is simple, making it a perfect first project. Also, if baseboard is to be installed it must fit flush to the door casing, so the first installation guide we have decided to publish is this one: how to install casing around a doorway.
Apart from doorway and the casing itself, here’s what you’ll need:
• Miter saw, or miter box and back saw
• 16oz hammer
• Nails
• Nail set
• Tape measure (maybe)
• Combination square
• 90-degree corner clamps (optional)
• Wood glue
• Sandpaper
• Wood filler (if painting)
• Caulk
• Sharp pencil
• Safety glasses
In truth, there are a great many ways to go about this job – a google search will yield pages of guides and videos, all telling you to do it a slightly different way. The most important points, however, will remain true no matter which specific method you follow. These key things to remember are:
• Start square. Ensure the door jambs are square to begin with. Check the angles between sides and top are truly 90 degrees with a square. If they are slightly out, then shim them. If it really isn’t possible to get them exactly right – perhaps in an old house or Adams Family mansion that has settled and taken on some serious ‘character’ – then you’ll have to custom fit the miters to match the funky angled doorways.
• Make sure the miter saw is cutting accurately. Check that the fence is undamaged and that the blade is square to it when set to 90 degrees. If you aren’t familiar with the miter saw, here is an excellent beginner’s guide: mitersawhub.com/operating-an-electric-miter-saw-a-beginners-guide
• Blunt the nails. You will need 1-1/4” (3d) or 1-1/2” (4d) finishing nails to attach the trim to the door jamb; if you’re nailing into the frame, then 2” or 2-1/2” nails (6d or 8d) will be required. Use a hammer to blunt the points on the nails to avoid splitting the wood. It is recommended that you wear appropriate protective gear whenever using a hammer and nails – safety glasses are the bare minimum, tools to hold the nails and eliminate the risk of flattening digits are cheap and available at all home hardware stores.
• If you are staining, not painting the casing, use solid hardwood with no finger jointing and stain the wood before cutting. If you are painting, then finger-jointed or MDF casing are options, but be aware that MDF can get chipped, so doesn’t age as well as wood, and finger-jointed wood isn’t vastly cheaper than factory-direct solid hardwood moulding. For paint-grade solid hardwood, poplar is a decent cheaper option. One thing to remember: is essential to apply quality primer to poplar before undercoating to ensure a lasting finish.
Order of Operations (for my favourite method):
1. If staining, stain casing in advance, before you cut.
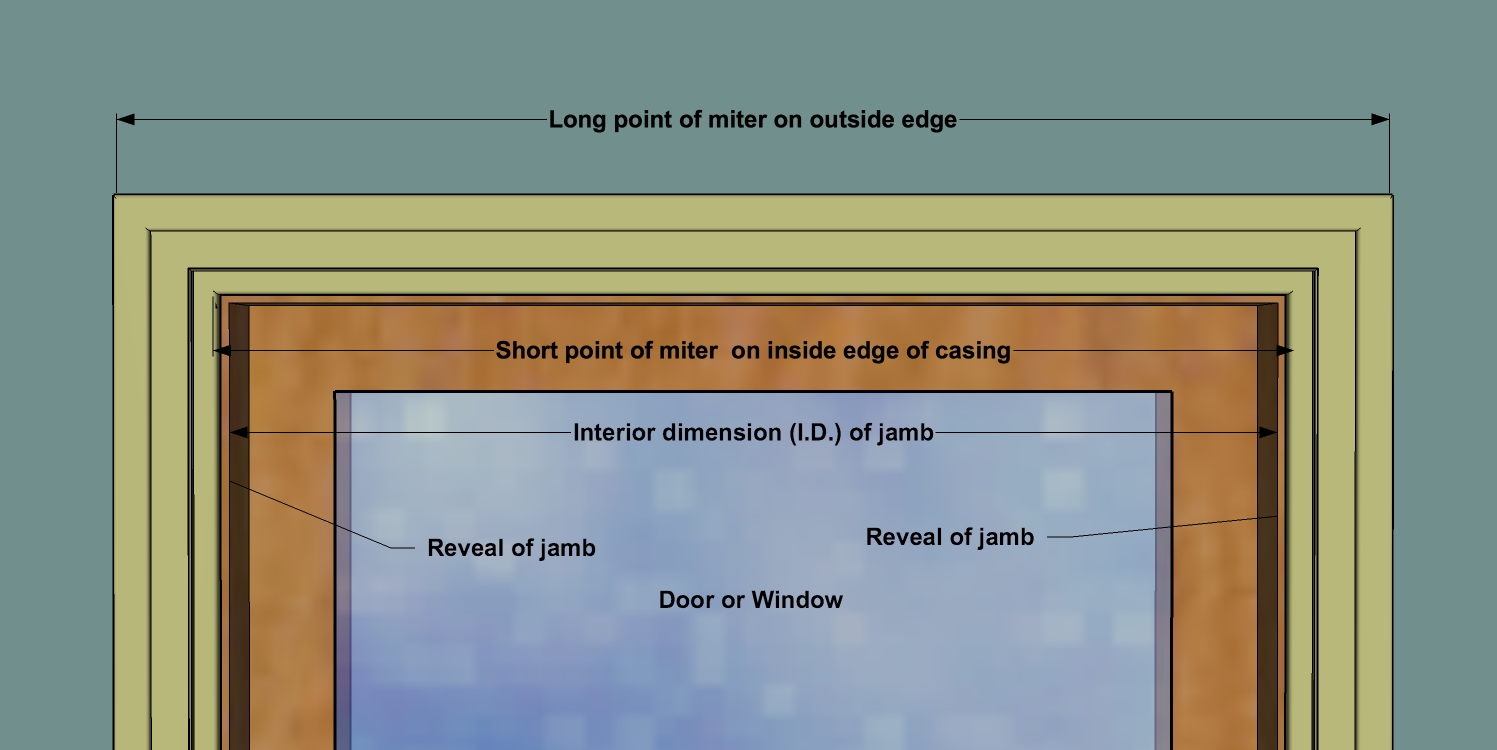
2. Measure the top, marking the reveal. The gap you leave on the door jamb inside the casing is called the reveal. Typically, this is 3/16” or 1/4”. Mark the inside corners for the top piece of casing, using your combination square and sharp pencil; then scribe a couple of marks down the sides and one in the center, to make positioning your casing easy.
3. Pre-cut miters on your side casing, and on one end of the top piece. Leave each piece long so that it can be cut down accurately to length (this is the only time during this process where the tape measure might be used – final lengths are all marked in-place). Remove any imperfection using the sandpaper.
4. Positioning the pre-cut end of the top piece, use your sharp pencil to mark the second piece, take it down and cut the final miter.
5. Fix the top piece in place. Use nails about 1-1/2” from the ends first, then put a nail in the middle. Leave these nails about 1/4” proud for now in case adjustments are needed.
6. Take the side pieces to their respective sides of the frame. Flip them upside down, letting the tips of the mitered ends (gently) touch the floor, then mark these pieces level with the tip of the miter on the already installed top.
7. Cut the side pieces to length.
8. Apply wood glue to the adjoining miters, position the sides and nail in place. Again, nails should be an inch or two from the ends and spaced about 12” apart in between. All the nails should be left slightly proud, then driven flush for stained wood, or a little below the surface if painting, using the nail set. To ensure the corners fit perfectly tightly, clamping with special 90-degree corner clamps while the glue sets is recommended.
9. Finally, once the glue is set, remove any clamps and fill nail-holes with wood filler, then sand down. Caulk the back edges of the casing and your installation is complete.